Tidal Lace FQs


Click to  my other blog: sewmessy.wordpress.com and leave a comment for a chance to win this entire collection of fat quarters!

The collection is called Tidal Lace and it was designed by the fabulous Kim Andersson for Windham Fabrics.


On SewMessy.wordpress.com, you will also find links to all the fabulous projects in this blog hop (and more chances to win!).

On SewMessy.wordpress.com, you will also find links to all the fabulous projects in this blog hop (and more chances to win!).

Also on SewMessy is a free pillow tutorial – so check it out, baby!

Free pillow pattern tutorial at sewmessy.wordpress.com

Free pillow pattern tutorial at sewmessy.wordpress.com

Check out my finished quilt, Midnight in the City, using the skyline blocks from my free tutorial. Click on the photo to link to the tutorial.

Sew messy

Midnight in the City quilt

My skyline quilt “Midnight in the City” was displayed at Stitch Modern in Piedmont, CA. It all started with my Skyline quilt block and a great group of friends on the Flickr bee, Simply Solids. Click on the photo to go to the free tutorial for the basic block I used to make this quilt.

View original post

Midnight in the City quilt.

I just posted this on sewmessy.wordpress.com.

Sew messy

Here is my latest tassel keychain. This one is about 10″ long and is very full. It’s made with strips of fine cotton batiks, threads, floss, charms and beads. I’ve added a couple closeups so you can see the dangling beads as well as the beads around the neck of the keychain and the wired beads where the tassel attaches to the sterling silver plated split keyring.

BlueTassel2 Blue tassel – look closely for the beads hanging near the bottom of the tassel

BlueTasselBest-001 Close up of wired beads and beads around the tassel neck

As I mentioned in my previous post, these tassels make great key rings, purse dangles and curtain tie-backs. You can also hang them from a lamp or use them to decorate the base of a tall candlestick.

Of course I had to include photos of my staff, who help with all stages of production and like to…

View original post 21 more words

Gotta check out this tassel. It’s posted on my sewmessy.wordpress.com blog.

Sew messy

Image

I made this tassel yesterday as a gift for my friend Barbara. I added tons of beads, though many are hidden in the depths of the tassel. 

An embellished tassel like this can be used as a keychain, a purse dangle, curtain tie back or, as shown in this photo, to spruce up an old brass lamp. It’s a little over the top, but I love adding this kind of rich texture to my life. 

I started by cutting narrow strips of three different fabrics. Then I threaded beads on embroidery floss and pearl cotton of various colors and weights. I tied a few of the larger beads to the fabric strips but wasn’t crazy about how jerky the fabric knots looked. (I kept them there because I don’t like to undo things very often. I prefer to keep it as is, my own personal creative expression, and try…

View original post 115 more words

Carol Van Zandt is an amazing designer I’ve had the pleasure of knowing recently. She designs gorgeous fabric, which is how I came to make her acquaintance, and also licenses her artwork for cell phone covers and other products. You can read more about Carol on her website: Carol Van Zandt

She gave me some samples from her recent fabric collections for Andover Fabrics. The gorgeous subtle blue, cream and taupe fabric used on this fabric canister is from her Tokyo Rococo collection for Andover Fabrics.

20131103-103620.jpg

Carol only had a small piece of this particular fabric to share, less than a fat quarter, so I paired it with a soft, touchable linen/cotton blend fabric. I cut the selvage off the linen, then decided I liked the fringed selvage and added it back onto the inner pocket.

20131103-104030.jpg

I also added a few glass beads as a counterpoint to the earthy linen.

20131103-104201.jpg

Carol has a gorgeous collection of paint brushes in her studios. Perhaps she can put a few brushes in this fabric canister since this is her holiday gift from me. Thanks, Carol, for your generous spirit and creative inspiration.

This is a wonderful reminder about the role each of us plays in each other’s lives. It’s from Frank Allocco, legendary basketball coach at DeLaSalle High School. Coach Allocco has been an amazing friend and mentor to my son.

Clink on this link:

How to be a Great Teammate

20131031-215337.jpg

Moonshine Serenade

I made this quilt top as a tester for The Quilt Pattern Magazine (TQPM). The pattern is in their May issue, if you’re interested. I chose a fabric that has an hombre effect for the sky. For the lake, I overlayed a silver mesh that I had laying around from a holiday idea that never came to fruition. The purple border fabric has a sparkle to it so I added a narrow black flange to keep the overall look from being too sticky sweet.

Image

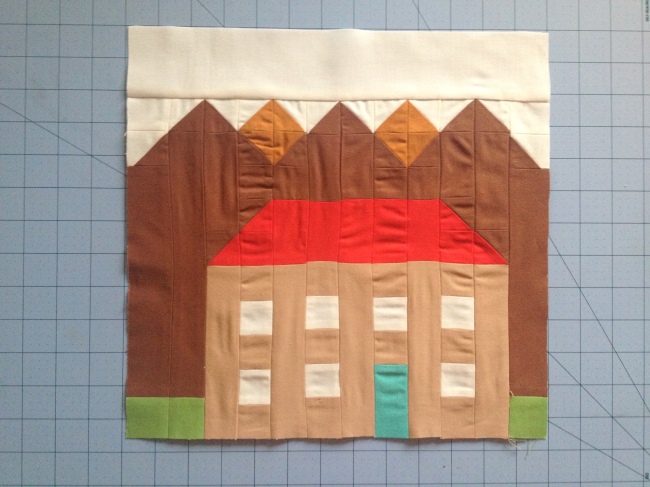
I wanted to make a quilt block of a house that looks a little like my house. I live in a stucco house in California. My house actually faces the hills, so I took a few liberties.

This design is very simple to make but feel free to design your own by following these steps.

Sketch:

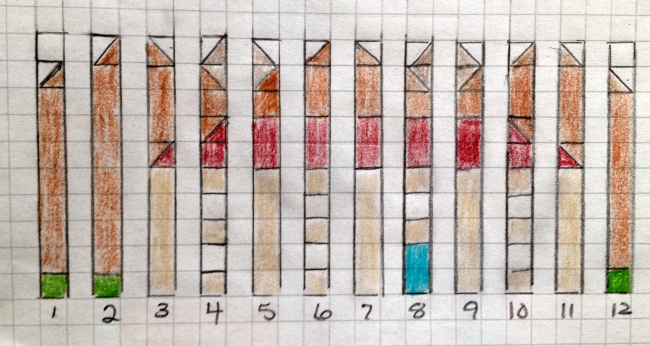
1. First start with a sketch of the block on graph paper. I wanted my house block to finish at 12” x 12”, so each square of the graph paper represents 1”. Just draw straight lines. If I can do this, you can.

Image

2. I like to play with color schemes using colored pencils, so I make a couple black-and-white copies of my drawing and fill in with colors I like. My house has a teal door :).

Image

3. I also separated the block into columns on the graph paper, so I could easily see how to cut and assemble the pieces.

Image

Cutting:

White:

Cut 1 strip 2 1/2” x 12 1/2” for sky.

Cut 9 squares 1 1/2” x 1 1/2” for windows and corners of sky.

Cut 6 squares 2” x 2” for half-square triangles.

Brown:

Cut 8 squares 2” x 2” for half-square triangles.

Cut 1 strip 1 1/2” x 8 1/2”.

Cut 2 strips 1 1/2” x 7 1/2”.

Cut 2 strips 1 1/2” x 3 1/2”.

Cut 3 strips 1 1/2” x 2 1/2”.

Cut 4 squares 1 1/2” x 1 1/2”.

Light Brown:

Cut 4 squares 2” x 2” for half-square triangles.

Red:

Cut 2 squares 2” x 2” for half-square triangles.

Cut 2 squares 1 1/2” x 1 1/2”.

Cut 5 strips 1 1/2” x 2 1/2”.

Tan:

Cut 11 squares 1 1/2” x 1 1/2”.

Cut 5 strips 1 1/2” x 5 1/2”.

Teal:

Cut 1 strip 1 1/2” x 2 1/2” for door.

Green:

Cut 3 squares 1 1/2” x 1 1/2” for grass.

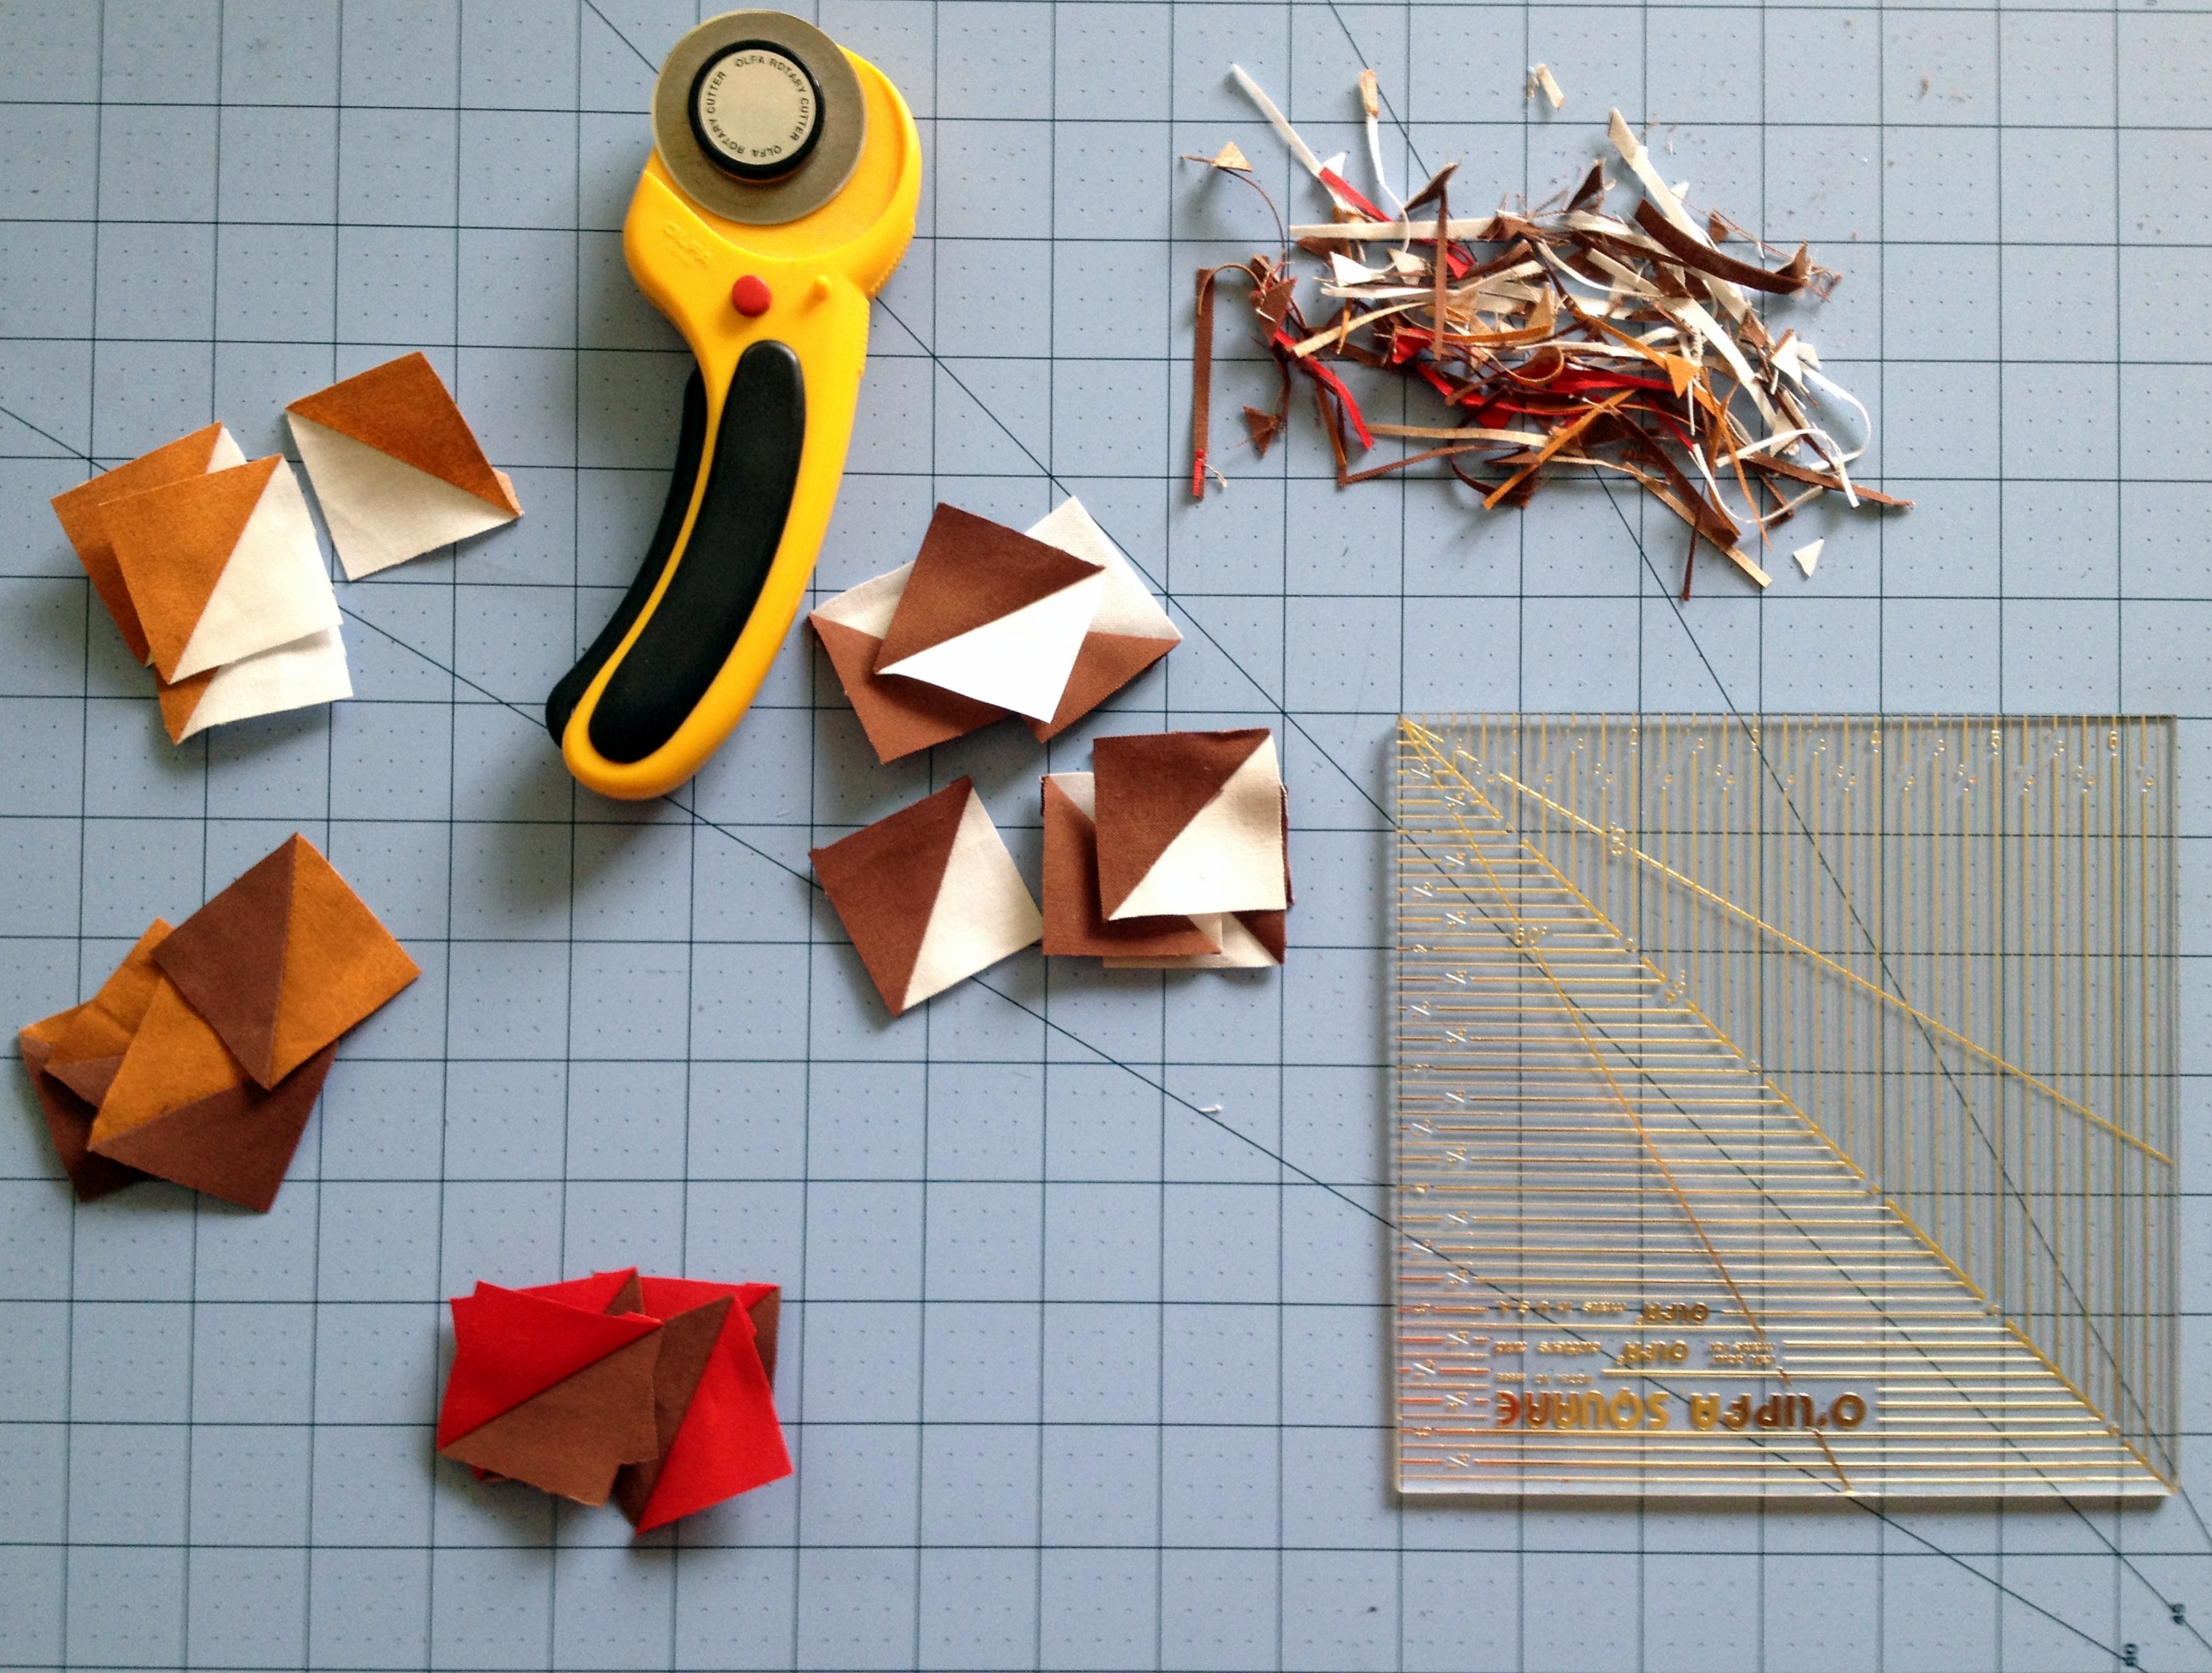
Half-square triangles:

1. Draw a diagonal line from corner to corner on the wrong side of 6 white and 2 light brown and 2 red 2” x 2” squares. Place the 2” x 2” squares in pairs with right sides together as follows: 4 white squares with 4 browns squares, 2 white squares with 2 light brown squares, 2 brown squares and 2 light brown squares, and 2 brown and 2 red squares. 

2. Sew a scant 1/4” on either side of the drawn line for each pair of squares. Cut on the drawn line and press the seam of each half-square triangle toward the dark fabric. Trim each half-square triangle to 1 1/2” x 1 1/2”.

Image

Assemble the block:

1. Arrange the cut pieces and half-square triangles in 12 columns using the sketch for reference. Make sure the half-square triangles are properly oriented.

Image

2. Sew the pieces into 12 columns using a 1/4” seam allowance. Press each seam open.

Image

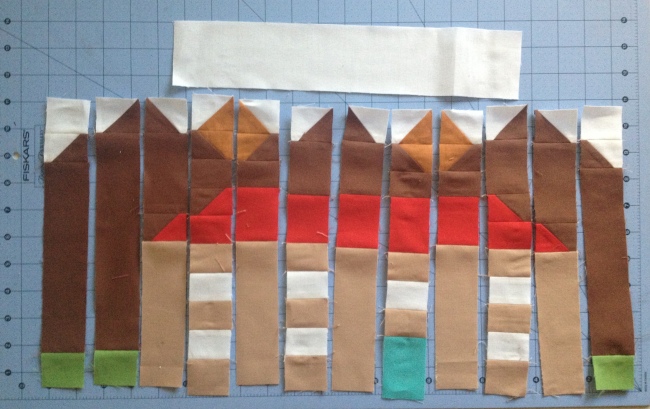
3. Pin the columns together matching seams and stitch. Press seams open.

Image

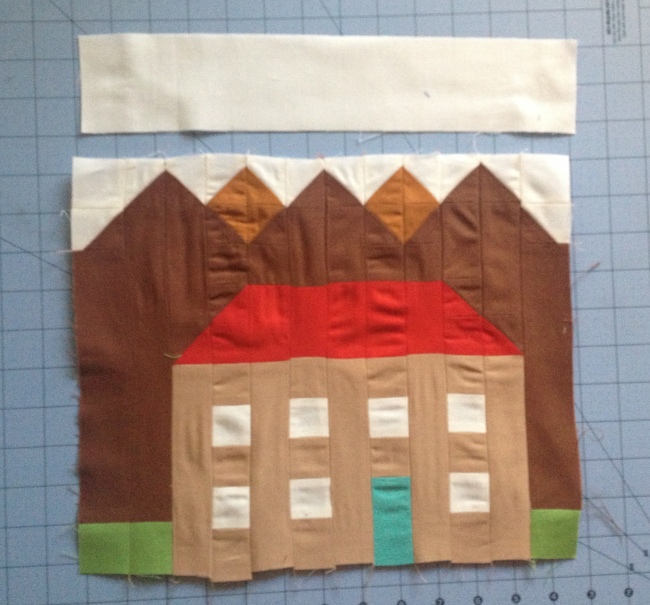
4. Stitch the 2 1/2” x 12 1/2” white piece to the top. Press seam toward the white piece.

5. Trim block to 12 1/2” x 12 1/2”.

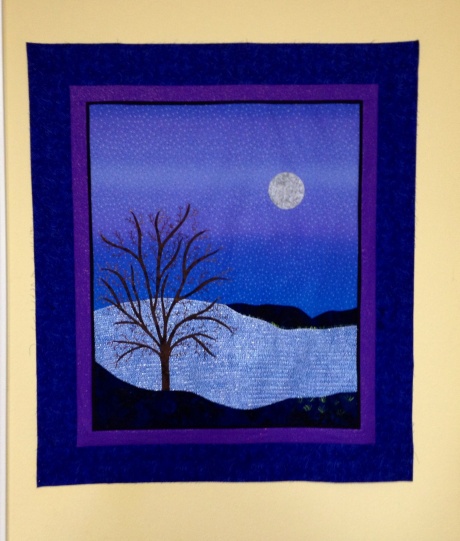
Fuse simple tree, bush or sun shapes, if desired. Gorgeous!